The first step is a pencil drawing. After Prismacolor changed their lead to a crappier, gritty formula I switched back to drawing with regular old grade school HBs. I use a Papermate HB #2 (sometimes #3 which is a little harder lead). I draw my roughs on photo-copy paper relatively loosely.
 Above is a section of my actual rough artwork. I scan the grey line art on the GRAYSCALE setting. My scanning sometimes doesn't pick up really light lines and I found that if there is something solid black on the scanner with my drawing more lines are "read". My solution - a post-it note with "SCAN!" written in thick black marker. I stick it on pencil drawings and they scans perfect every time. Just remember to delete the post-it in Photoshop.
Step two-ish is to convert your grey line to blue. I used to do it in a really complicated way which I won't tell you here (so as not to confuse and also because I can't believe I used to do it any other way). The easiest way to convert your art to blue, or 100%CYAN, is as follows: With your greyscale file open SELECT ALL and COPY your image. DELETE it. That's right. DELETE it. You need a clean background for the next step (you could also have a second window open if you're nervous about losing your artwork for ever). Convert your file to CMYK. Select the CHANNELS pallette (it's in with LAYERS, HISTORY, etc...) and highlight the CYAN CHANNEL.
PASTE your artwork into the CYAN CHANNEL.
Return to your LAYERS palette. Your art probably still looks grey, which is why you now create a DUPLICATE LAYER of the background.
Did it just show up blue? Awesome. Delete the background layer and you've got a perfectly 100% Cyan image that, when inked, won't scan.
 My next step (step three) is to tighten the pencils. I LOVE pencilling over a blueline that won't erase or disappear no matter how much I abuse my paper. Okay, I can't spill coffee on it or call it degrading names but it's pretty near un-removable. You may not want to print out at 100%...instead you can reduce the opacity of your Cyan layer to 15-30%. It's a little easier to draw over your rough if the blueline isn't overpowering your senses.
I realize that I still erase my pencils after I've inked the image which you might think defeats the purpose of printing the blue. Well, I still have that crutch but the better artists among you can ink right over your blue art with nary an HB coming near the page. I ink all of the Spirit pages like that...Darwyn's pencils converted to blueline at about 30% opacity so I can still make out all the details. It's a beautiful way to work.
 When you scan the black and white art for colouring make sure that your scanner is set on LINEART or BLACK AND WHITE (whatever your scanner setting is) and the blue will not scan.
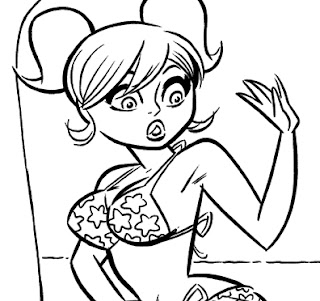
 Incidentally, the above image is not ready to be seen in full yet. But you don't need to see the whole thing for a tutorial, do you? :)
Also, I don't foresee doing an inking tutorial at any time. Instead I'm going to recommend getting Gary Martin's book THE ART OF COMIC BOOK INKING. I searched for it at Amazon and apparently only Volume 2 is available. I have never seen Volume 2 and heard it isn't nearly as good or informative as volume 1. If you have used bookstores near you I suggest starting there.
My only other suggestion is to get your hands on as many pages of pencilled comic art (online, from friends, scans from the Kirby collector, etc...) as you can and start there. Hey, you can even print out blue line copies of the art so if you muck it up make another print out and start over. Easy peasy!
Happy drawing!
j.
16 comments:
Priceless tutorial. I've been waiting for this one for a while now. Thank you so very much. I upgraded to Photoshop CS2 yesterday and finally I can actually follow your instructions step for step instead of looking at my Photoshop Elements 2.0 (yes, sad) screen puzzled.
Thanks ever so much.
Yeah well, you didn't look hard enough, here's a link to Volume 1:
http://www.amazon.com/Art-Comic-Book-Inking-Gary-Martin/dp/1569712581
Anonymous - Your welcome very much. I'm glad I could be helpful and glad for you that you've updated programs :) I don't think I've ever tried colouring in Photoshop Elements.
Gary Martin - Many thanks for the link to Volume 1. And may I also add my thanks to you for writing Volume 1. As I've said it was a terrific help to me in moving my inking beyond what was at the time more akin to the style of a colouring book.
Check out Gary's link, folks. There are a few online used bookstores where the book is available. Dark Horse really ought to put it back in print, if you asks me!
best,
j.
Beatiful...from the blue line to the final piece..all steps are awesome.
Your fan,
Marcelo
NIce!
She is so super-cute! Makes me wanna take a last-minute flight to some hot island down south! I love your lines, colours, and moiré (sp?) effect, it gives the drawing such a vintage/nostralgic air. Coolio! :-)
Wow, thanks so much for taking the time to post these tutorials. They're entertaining and easy to follow!
j. - one really important thing that needs to be mentioned (unless i'm a total Photoshop moron!): to make the "paste into CYAN channel" thing work, you have to have a layer with a solid white background. i tried to do the trick with a transparent layer, and i thought i was going to go completely crazy trying to make some blue line art cause nothing was showing up!!! not saying i'm 100% right about this, but making sure the layer was white before my paste did the trick for me.
I also used to have a more complicated way of doing this, but the way I do my conversions now is to simply switch from 'grayscale' to 'duotone' in the Image-Mode settings. Then you can enter the exact numerical setting of the color(s) you want it to print as. No need to alter opacity, etc. Just simply enter the number 10 (or 20 or 30, etc) in the C channel there. Done. Print.
One reason I switched to this method is because we often found in our studio that the printer would run out of blue ink faster than other colors, so we would sometimes choose to print in pink or light green, et al, to wear out the colors more evenly. When you print out at a low enough ink saturation setting, even pinks and greens won't show up much when you scan your black and white (inked) lineart.
I actually scan most of my work (even inked) as RGB (as opposed to grayscale or lineart) and make adjustments in Levels after deleting some of the redundant channels. I find it gives me a lot of extra control over the quality of my final. Also, anything that ever does pick up in a scan can usually be eliminated by adjusting the Levels.
What printer do you recommend?
Hi J.,
I'm an inker who has not yet tried inking on bluelines that were printed out of a computer. But now I've been asked to do a job this way. I found your tutorial very helpful. However I still need to buy a printer. My question is are all inkjet printers compatable with this method. I just want to make sure that my india ink will cover the printer ink.
I'm on a budget and found a HP printer that fits my budget "HP Officejet 7610" hoping this will work. Any thoughts? The work is coming tomorrow. :0
Thanks,
Scott
Hi Scott,
I suspect you won't have any problems covering the blue line with ink. In my experience inkjet ink is not waxy or otherwise "solid" enough on the page to cause inking problems. I've got an HP Officejet 7000 and never had a problem.
Actually, my only problem with the printer is that it doesn't roll the bristol board out as well as it used to. The bottoms of my pages are "scrunched" and I have to re-draw the last half inch or so.
Hope the job goes well, Scott.
j.
Hi J.
Thanks so much getting back to me so fast, and for the help glad to hear you are are using a similar printer with no problems.
Now I can move ahead with confidence.
I hope the job goes well too, it's a four issue mini series, and only the second job done for them (IDW) and I want to keep them happy!
Scott
Hi J.
Got the first seven page early, and converted them to bluelines. It was a piece of cake! THANKS!
Scott
Right on! Glad to hear it worked out, Scott.
IDW's a good company to work for :)
j.
Post a Comment